Install WhatPulse on macOS
The WhatPulse macOS app is simple to install. You can either watch this short video of how to install using the wizard, or you can check out the stop by step instructions below the video. If you'd like to install WhatPulse using the terminal or homebrew, check out the last chapters on this page.
Installation steps
- Navigate to the Downloads.
- Click the Download for Mac button.
- Open the downloaded whatpulse-mac-latest.dmg file.
- Open the installer application.
- Click Open on the
an app downloaded from the internetmacOS warning and follow the prompts to complete the installation. - After you complete the installation, WhatPulse will request system permissions for Accessibility and Input Monitoring. These permissions are required for WhatPulse to function. For detailed instructions on granting these permissions, see Managing Privacy & Security Permissions.
After you complete the installation and enable system permissions, you are greeted by the welcome screen. Now, you can choose to log in to an existing account or create a new one.
Creating a New WhatPulse Account
- Click "Register Account" and click Continue. The WhatPulse website opens in a new browser tab.
- Complete the registration form and activate your account.
- After you activate your account, you can create a new computer profile. The website will show you how to create this computer profile and link it to the computer you're installing WhatPulse.
- When the computer profile is created, the WhatPulse software automatically logs in and start monitoring your stats.
Using an Existing WhatPulse Account
- In the WhatPulse client
Welcomescreen, click on Login. The WhatPulse website opens in a new browser tab. - Sign in to your WhatPulse account.
- In the
Authorize Clientpage, do one of the following:- If you are reinstalling WhatPulse on a computer that you have used before, click Use an existing Computer.
- If it's a new computer, click Create a new computer.
- After you select or create a create a computer profile, the WhatPulse client automatically log in and start monitoring your stats.
Installing via Homebrew
If you prefer using Homebrew, a package manager for macOS, you can easily install WhatPulse by following these steps:
- Open Terminal on your macOS. You can find it by going to Spotlight (press Cmd + Space) and typing "Terminal".
- If you haven't installed Homebrew yet, run the following command in Terminal:
/bin/bash -c "$(curl -fsSL https://raw.githubusercontent.com/Homebrew/install/HEAD/install.sh)"
- Once Homebrew is installed, you can use the following command to install WhatPulse:
brew install --cask whatpulse/whatpulse/whatpulse
- Wait for Homebrew to download and install the WhatPulse package. The installation process will automatically handle all necessary dependencies.
- WhatPulse will open when it's done installing. When it's open, you can refer to Creating a New WhatPulse Account or Using an Existing WhatPulse Account to log into WhatPulse and start collecting statistics.
Congratulations! You have successfully installed WhatPulse using Homebrew on macOS.
Installing via the Terminal
If you prefer to install WhatPulse on macOS using the installer instead of Homebrew, you can follow these steps:
- Navigate to the Downloads.
- Click the Download for Mac button.
- Once the download is complete, locate the downloaded .dmg file in your Downloads folder or the designated download location.
- Double-click on the downloaded .dmg file to open and mount it.
- Open Terminal on your macOS. You can find it by going to Spotlight (press Cmd + Space) and typing "Terminal".
- In Terminal, run the following command, replacing VERSION with the appropriate version number:
/Volumes/WhatPulse\ VERSION/WhatPulse-VERSION-Installer.app/Contents/MacOS/WhatPulse-VERSION-Installer --root /Applications/WhatPulse --accept-messages --accept-licenses --confirm-command install
- Wait for the installation process to complete. Once finished, you can close Terminal.
- WhatPulse will open when it's done installing. When it's open, you can refer to Creating a New WhatPulse Account or Using an Existing WhatPulse Account to log into WhatPulse and start collecting statistics.
Congratulations! You have successfully installed WhatPulse on macOS using the installer.
When you are using remote deployment tools, you can download the latest WhatPulse installer to a central file repository from where the remote computers can retrieve it for their installation.
Managing Privacy & Security Permissions
WhatPulse requires specific macOS system permissions to monitor your keyboard, mouse, and network activity. These permissions are critical for the app to function properly. This section covers both initial permission setup and troubleshooting steps if permissions are not working correctly.
Understanding Required Permissions
WhatPulse needs access to two key privacy settings in macOS:
- Accessibility: Allows WhatPulse to monitor keyboard and mouse events
- Input Monitoring: Enables WhatPulse to track which applications you're using
Without these permissions, WhatPulse cannot collect statistics.
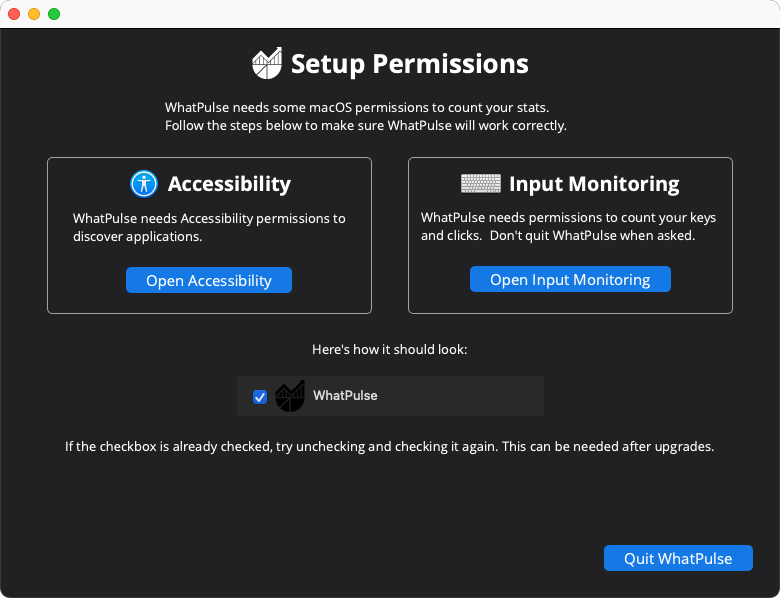
Initial Permission Setup
When you first launch WhatPulse after installation, the app will automatically request the necessary permissions.
-
After opening WhatPulse for the first time, you'll see a permission request dialog.
-
Click Open Accessibility on the permissions dialog.
- This action opens the System Settings (or System Preferences on older macOS versions) directly to the Accessibility section.
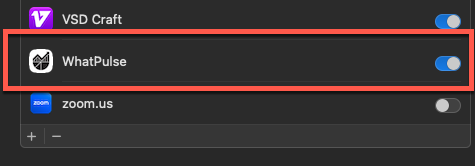
- Enable the checkbox next to WhatPulse to permissions:
- After granting the permission, you'll be asked for your password to confirm the change.
- Choose Later when prompted to restart Now or Later; you can restart WhatPulse in the next step.
-
When the permission is set, the WhatPulse window will show a green checkmark to indicate that's correct.
-
Next, click Open Input Monitoring on the WhatPulse app permission dialog.
- This action opens the System Settings (or System Preferences on older macOS versions) directly to the Input Monitoring section.
- Enable the checkbox next to WhatPulse to grant permissions
-
Click Restart WhatPulse in the WhatPulse app to restart with the new permissions.
After completing these steps, WhatPulse should start collecting your statistics normally.
Troubleshooting Permission Issues
Sometimes macOS may remove or reset WhatPulse's permissions, particularly after:
- Major macOS system updates
- Security updates from Apple
- Reinstalling or updating WhatPulse
If WhatPulse continues to ask for permissions even though it's already listed in your System Settings, you'll need to remove and re-add the app to refresh the permissions.
Resetting WhatPulse Permissions
Follow these steps to reset WhatPulse's permissions:
-
Quit WhatPulse completely:
- Right-click the WhatPulse icon in the menu bar and select Quit.
-
Open System Settings (macOS Ventura and later) or System Preferences (older macOS versions):
- Click the Apple menu in the top-left corner.
- Select System Settings or System Preferences.
-
Navigate to Privacy & Security:
- Click Privacy & Security in the sidebar.
-
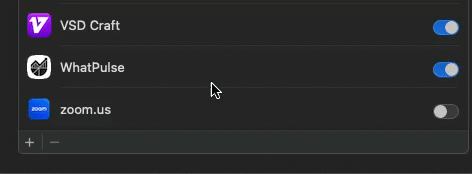
Remove WhatPulse from Accessibility:
-
Click Accessibility.
-
Click the lock icon (if present) and enter your password to unlock.
-
Find WhatPulse in the list.
-
Hover over WhatPulse and click the minus (-) button or right-click and select Remove.
-
Confirm the removal, confirming with your password if prompted.
-
-
Remove WhatPulse from Input Monitoring:
- Click Input Monitoring from the Privacy & Security section.
- Find WhatPulse in the list.
- Hover over WhatPulse and click the minus (-) button or right-click and select Remove.
- Confirm the removal.
-
Start WhatPulse:
- Open WhatPulse from your Applications folder or Launchpad.
- The app will now request permissions again, as if it's the first time.
- Follow the Initial Permission Setup steps above to grant permissions.
After removing WhatPulse from the permission lists, you must completely quit and restart the application for macOS to recognize it as a new permission request. Simply closing the window is not enough.