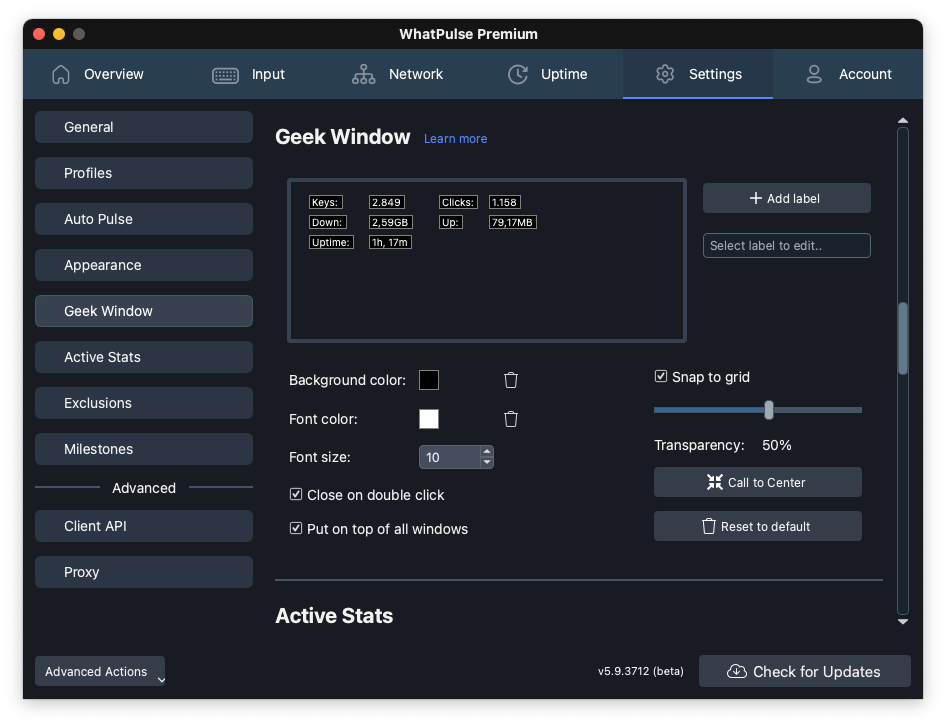
Customizing the Geek Window
The Geek Window is a customizable overlay window for monitoring system information such as keys, clicks, download, upload software, etc. With the Geek window, you can create a personalized, always-on-top overlay that displays your WhatPulse statistics while using other applications on your computer. You can move the geek window, customize transparency, and choose the background and font color. As the name suggests, it is designed for the geek in you.
| Callout | Option | Action |
|---|---|---|
| 1 | Configure section | Provides a preview of the Geek Window. You can add or delete statistics for this section. |
| 2 | Reset | Enables you to reset the Geek Window to default. |
| 3 | Call to Center | Brings the Geek Window to the center of the screen. |
| 4 | Font Setting | Enables you to configure the Geek Window font color. |
| 5 | Transparency | Enables you to configure the transparency setting. Move the slide bar to the left to decrease the transparency or the right to increase the transparency. |
| 6 | Close Geek Window on double click | Option to close the Geek Window when double-clicked. |
| 7 | Put Geek Window on top | Option to keep the Geek Window overlay on top of other windows. The overlay will always be visible if this option is enabled, even when other windows are open. |
Start the Geek Window
- From the tray menu bar, right-click the WhatPulse icon.
- Click Toggle Geek Window.
Add stats to the Geek Window
You can configure statistics that you want to view in the Geek Window by adding or deleting statistics from the Geek window. To add a statistic, do the following:
- Open WhatPulse and go to the Settings tab and Geek Window section.
- In the Geek Window, click Add. You see an Edit me label in the preview section.
- Select the Edit me label in the left window, and do one of the following:
- Rename the Edit me label as needed.
- Select the statistic you want to see from the Insert statistic drop-down menu.
Your changes are automatically saved to the Geek Window. Have it open, next to the settings, to see your changes being reflected.
You can also add two labels; use one label to add the name of the statistic and another to insert the actual statistic.
